MARINESURPLUS.COM
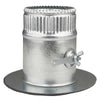
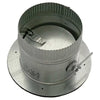
Collar W/Damper, 4 in Duct Dia, Galvanized Steel, 26 GA, 6 in W x

Description
The Greenseam collar with damper is a factory-sealed, spin-in duct fitting designed to transition into duct runs efficiently while providing airflow control. Ideal for HVAC trunk lines where branch duct takeoffs require the ability to isolate or adjust airflow.
Key Specifications
|
Spec |
Value |
|
Nominal Duct Diameter |
4 in (for branch takeoff) |
|
Material / Gauge |
Galvanized steel, 26 gauge |
|
Overall Length |
5 in |
|
Weight |
~0.8 lb |
|
Maximum Pressure Rating |
3 in W.G (water gauge) |
|
Mounting Style |
Spin-in collar (installed directly into trunk duct) |
|
Sealing & Leakage Control |
Factory-sealed design with low-leakage hardware |
|
Usage |
Branch duct takeoff with damper control (fully open / closed) |
Benefits & Applications
-
Airflow Control at Branch Takeoffs
The integrated damper lets you open or close the branch line to balance airflow or isolate sections without shutting down the main duct. -
Factory-Sealed & Low-Leak Design
The collar is built with factory sealing and low-leakage hardware to minimize energy losses and maintain system efficiency. -
Spin-In Installation Convenience
The spin-in collar style makes installation simpler — just spin into a pre-cut hole in the trunk duct and seal. -
Robust Construction for HVAC Use
The galvanized 26-ga steel ensures structural integrity, durability, and corrosion resistance in typical HVAC environments. -
Compact Form Factor
At just 5 in in length, it doesn’t intrude deeply into the trunk duct, preserving internal duct flow.
Installation & Usage Tips
-
Cut a Proper Hole in the Trunk Duct
Use the recommended diameter for a 4″ spin-in collar and deburr the edges before inserting the collar. -
Spin and Seal Carefully
Rotate the collar into place and then apply sealant or tape along the seam to ensure airtight connection. -
Damper Operation
After installation, operate the damper to confirm smooth travel between open and closed positions without binding. -
Maintain Access to Damper
Leave enough clearance so the damper handle can be accessed easily for adjustments. -
Check for Leakage
After system start-up, inspect joints and damper edges for leaks. Use foil tape or HVAC sealant where needed.